


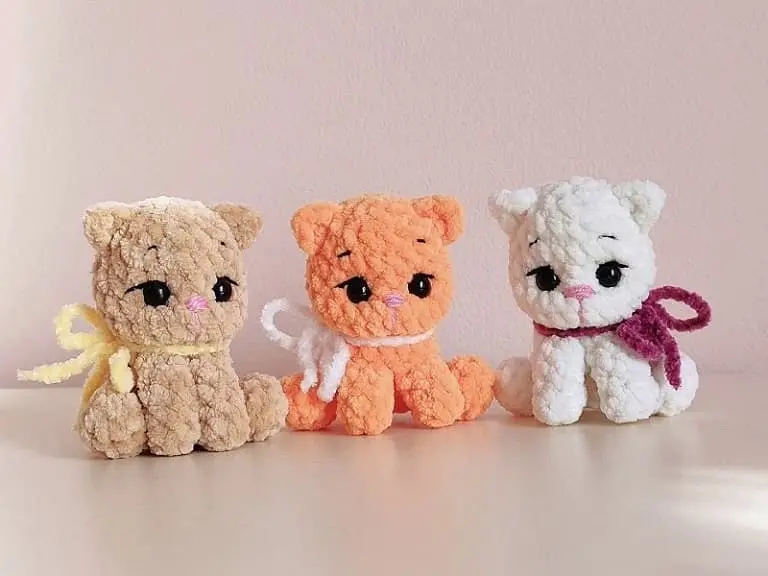
Here is a little sweet amigurumi kitten pattern made with chenille yarn. These crochet plush kittens are so soft and cuddly and will make perfect gifts for you and your loved ones! The size of finished crochet little cat is about 8 cm (3.1″) with ears.
Designer: @oksankakhita
You will need:
- Himalaya Dolphin Baby yarn (~ 20g) or Alize Softy Plus (~ 15g)
- YarnArt Jeans yarn for a bow and a little black and pink for embroidering (divide the pink yarn in 2 threads, the black one in one thread for whiskers)
- Some cotton yarn in tone of the main yarn for eye tightening
- 3.5 mm crochet hook for a cat
- 2.2 mm crochet hook for a bow
- 9 mm black safety eyes
- 7х9 mm pink safety nose
- Stitch marker
- Yarn needle
- Scissors
- Sewing pins
- Fiberfill
Free amigurumi kitten pattern
Abbreviations:
R – row
ch – chain
st – stitch
sl st – slip stitch
sc – single crochet
hdc – half double crochet
inc – increase (2 sc in one stitch)
dec – decrease (2 sc together)
[…] – number of stitches you should have at the end of the row
(…) – repeat whatever is between the brackets the given number of times

Legs (make 2)
Stuff a little, giving a shape.
R 1: 6 sc in magic ring [6]
R 2: (2 sc, inc) repeat 2 times [8]
R 3: 8 sc
R 4: 1 sc, 3 dec, 1 sc [5]
Sl st. Fasten off.
The legs will be crocheted into the body.
Arms (make 2)
Do not stuff.
R 1: 6 sc in magic ring [6]
R 2-5: 6 sc (4 rows)
Fasten off.
The arms will be crocheted into the body.
Tail
Do not stuff.
R 1: 6 sc in magic ring [6]
R 2-8: 6 sc (7 rows)
R 9: 4 sc, dec [5]
R 10: 1 sc. Fold the tail in half and crochet 2 sc through both sides.
Fasten off.
The tail will be crocheted into the body.
Ears (make 2)
Make 2 ch.
R 1: From the 2nd chain from hook: (hdc, sl st) repeat 2 times, hdc
Fasten off and leave a long tail for sewing.
Head and body (one piece)
Stuff as you go.
Make 5 ch.
R 1: From the 2nd chain from hook: inc, 2 sc, 4 sc in last st, turn, on the opposite side of the chain: 2 sc, inc [12]
R 2: 1 sc, inc, 2 sc, (1 sc, inc) repeat 2 times, 3 sc, inc [16]
In the next row we will crochet the legs and tail into the body. The decreases made in the 4th row of the leg should be on top.
R 3: 2 sc together with sc of the 1st leg, 4 sc, 2 sc together with sc of the 2nd leg, 3 sc, 2 sc together with sc of the tail, 3 sc [16]
R 4-5: 16 sc (2 rows)
In the next row we will crochet the arms into the body.
R 6: 1 sc, 3 sc together with sc of the 1st arm, 3 sc together with sc of the 2nd arm, 9 sc [16]
R 7: 1 sc, 6 hdc, 9 sc [16]
R 8: (2 sc, dec) repeat 4 times [12]
R 9: FLO: inc, (2 hdc in one st) repeat 6 times, 5 inc [24]
R 10-11: 24 sc (2 rows)
R 12: 3 sc, dec, (6 sc, dec) repeat 2 times, 3 sc [21]
R 13: (5 sc, dec) repeat 3 times [18]
R 14: 18 sc
Insert safety eyes between R 11 and R 12 at the distance of 4 st from each other.
If you use a safety nose, insert it between R 10 and R 11. Attach a pink thread to the stem of the nose, which you then use to embroider the muzzle. Embroider a line from the nose with this pink thread.
R 15: (1 sc, dec) repeat 6 times [12]
R 16: (dec) repeat 6 times [6]
Fasten off.
Eye tightening for amigurumi

Take a long needle with yarn in tone of the main yarn.
Leaving a long yarn tail at the beginning, insert the needle in the point #1 and draw it out the point #2. Then insert the needle in the point #3 and draw it out the point #1. Move to the right, skip one (central) increase with hdc and insert the needle in the point #4.
Make tightening for the second eye:
Insert the needle in the point #4 and draw it out the point #5. Then insert the needle in the point #6 and draw it out the point #4.
Pull slightly. Tie two ends of yarn together.
Insert the needle with one yarn tail in the point #7 and draw it out the point #3. Then insert the needle in the point #8 and draw it out in the back of the head.
Insert the needle with other yarn tail in the point #7 and draw it out the point #6. Then insert the needle in the point #9 and draw it out in the back of the head on 1 sc to the side from the first yarn tail.
Pull the ends and tie together.

Assembly
Embroider eyebrows, lashes and whiskers.
Sew the ears to the head.
Wrap the tail around the body and secure with a few stitches, controlling the cat’s posture so that it sits straight.
Bow
With 2.2 mm crochet hook and YarnArt Jeans yarn:
Make 70 ch.
Tie a bow around the cat’s neck.
Your amigurumi kitten is ready!
Do you close up the arms and legs after attaching them or do you fold them in half and sew together like the tail? The directions only mention attaching inn1 row with half the amount of stitches but if I leave it like that, the finished product does not look right. Also my neck seems to be longer and I have tight stitches, am I missing something?