

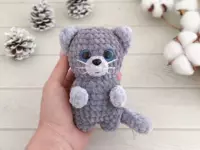


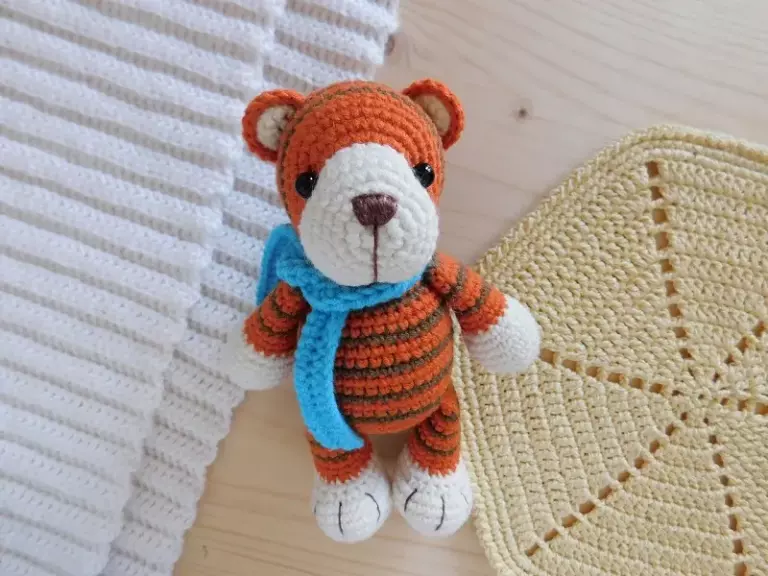
Crochet a cute tiger toy with this free amigurumi pattern! The arms and legs of the amigurumi tiger are attached with single crochet as you crochet the body. The finished size of the crochet tiger is about 18 cm (7.0″).
Designer: Svetlana Bolotova
You will need:
- YarnArt Jeans yarn (55% cotton, 45% acrylic, 50 g/160 m)
- 1.5 mm crochet hook
- Black sewing eyes
- Some thin brown yarn or embroidery floss for embroidering a nose
- Black thread
- Tapestry and hand sewing needles
- Scissors
- Stitch marker
- Fiberfill
Free amigurumi tiger pattern
Abbreviations:
R – row
ch – chain
sl st – slip stitch
sc – single crochet
hdc – half double crochet
inc – increase (2 sc in one stitch)
dec – decrease (2 sc together)
[…] – number of stitches you should have at the end of the row
(…) – repeat whatever is between the brackets the given number of times
Arms (make 2)
Start with white yarn:
R 1: 6 sc in magic ring [6]
R 2: (inc) repeat 6 times [12]
R 3: (1 sc, inc) repeat 6 times [18]
R 4: (5 sc, inc) repeat 3 times [21]
R 5-7: 21 sc (3 rows)
R 8: (5 sc, dec) repeat 3 times [18]
R 9: (4 sc, dec) repeat 3 times [15]
Change to orange yarn:
R 10-12: 15 sc (3 rows)
Change to brown yarn:
R 13: 15 sc
Change to orange yarn:
R 14-15: 15 sc (2 rows)
Change to brown yarn:
R 16: 15 sc
Change to orange yarn:
R 17-18: 15 sc (2 rows)
Change to brown yarn:
R 19: (3 sc, dec) repeat 3 times [12]
Change to orange yarn:
Fold the top opening flat and 5 sc through both sides.
Fasten off and leave a long tail for sewing.

Legs (make 2)
Start with white yarn:
Make 6 ch.
R 1: From the 2nd ch from hook: 4 sc, 3 sc in one st, on the opposite side: 3 sc, inc [12]
R 2: inc, 3 sc, 3 inc, 3 sc, 2 inc [18]
R 3: 1 sc, inc, 3 sc, (1 sc, inc) repeat 3 times, 3 sc, (1 sc, inc) repeat 2 times [24]
R 4: 2 sc, inc, 3 sc, (2 sc, inc) repeat 3 times, 3 sc, (2 sc, inc) repeat 2 times [30]
R 5-8: 30 sc (4 rows)
R 9: 6 sc, 8 dec in FLO, 8 sc [22]
R 10: 22 sc
Change to orange yarn:
R 11: 6 sc, 4 dec in FLO, 8 sc [18]
R 12-13: 18 sc (2 rows)
Change to brown yarn:
R 14: 18 sc
Change to orange yarn:
R 15-16: 18 sc (2 rows)
Change to brown yarn:
R 17: 18 sc
Change to orange yarn:
R 18-19: 18 sc (2 rows)
Change to brown yarn:
R 20: 18 sc
Change to orange yarn:
R 21: 18 sc
On the left leg: fold the top opening flat and 8 sc through both sides.
Fasten off.
On the right leg:
R 22: 9 sc only
Fold the top opening flat and 8 sc through both sides.
Fasten off.
Body
Start with orange yarn:
R 1: 6 sc in magic ring [6]
R 2: (inc) repeat 6 times [12]
R 3: (1 sc, inc) repeat 6 times [18]
R 4: (2 sc, inc) repeat 6 times [24]
R 5: (3 sc, inc) repeat 6 times [30]
R 6: (4 sc, inc) repeat 6 times [36]
R 7: (5 sc, inc) repeat 6 times [42]
R 8: attach the legs: 8 sc together with sc of the 1st leg (left), 13 sc, 8 sc together with sc of the 2nd leg, 13 sc [42]
Change to brown yarn:
R 9: 42 sc
Change to orange yarn:
R 10-11: 42 sc (2 rows)
Change to brown yarn:
R 12: 42 sc
Change to orange yarn:
R 13-14: 42 sc (2 rows)
Change to brown yarn:
R 15: 42 sc
Change to orange yarn:
R 16: (5 sc, dec) repeat 6 times [36]
R 17: 36 sc
Change to brown yarn:
R 18: 36 sc
Change to orange yarn:
R 19: 42 sc
R 20: (4 sc, dec) repeat 6 times [30]
Change to brown yarn:
R 21: 30 sc
Change to orange yarn:
R 22: 30 sc
23 р. attach the arms: 2 sc, 5 sc together with sc of the 1st arm, 11 sc, 5 sc together with sc of the 2nd arm, 7 sc [30]
Change to brown yarn:
R 24: (3 sc, dec) repeat 6 times [24]
Change to orange yarn:
R 25: (2 sc, dec) repeat 6 times [18]


Head
Start with white yarn:
R 1: 6 sc in magic ring [6]
R 2: (inc) repeat 6 times [12]
R 3: (1 sc, inc) repeat 6 times [18]
R 4: (2 sc, inc) repeat 6 times [24]
R 5: (3 sc, inc) repeat 6 times [30]
R 6: (4 sc, inc) repeat 6 times [36]
R 6-8: 30 sc (3 rows)
Change to orange yarn:
R 9: 12 sc, 6 inc, 12 sc [36]
R 10: 12 sc, (1 sc, inc) repeat 6 times, 12 sc [42]
R 11-13: 42 sc (3 rows)
Change to brown yarn:
R 14: 42 sc
Change to orange yarn:
R 15-16: 42 sc (2 rows)
Change to brown yarn:
R 17: 42 sc
Change to orange yarn:
R 18-19: 42 sc (2 rows)
Change to brown yarn:
R 20: 42 sc
Change to orange yarn:
R 21: 42 sc
R 22: (5 sc, dec) repeat 6 times [36]
R 23: (4 sc, dec) repeat 6 times [30]
R 24: (3 sc, dec) repeat 6 times [24]
R 25: (2 sc, dec) repeat 6 times [18]
R 26: (1 sc, dec) repeat 6 times [12]
R 27: (dec) repeat 6 times [6]
Fasten off.

Tail
Start with brown yarn:
R 1: 6 sc in magic ring [6]
Change to brown yarn:
R 2: (inc) repeat 6 times [12]
R 3: 12 sc
Then alternate two colors orange and brown to get stripes (two rows in orange, one in brown).
R 4-21: 12 sc (18 rows)
R 22: (2 sc, dec) repeat 3 times [9]
Fold the top opening flat and 4 sc through both sides.
Fasten off and leave a long tail for sewing.

Ears
Inner part (make 2)
With white yarn:
R 1: 2 ch, 5 sc in 2nd ch from hook, 1 turning chain
R 2: (inc) repeat 5 times [10]
Fasten off.

Outer part (make 2)
With ornage part:
R 1: 2 ch, 5 sc in 2nd ch from hook, 1 turning chain
R 2: (inc) repeat 5 times [10]
Do not cut the yarn.
Put out the outer part and inner part together (wrong side to wrong side) and crochet through both parts sc around.
Fasten off and leave a long tail for sewing.

Sew the ears on the head on R 20, the head to the body. When you will sew on the head to the body, make sure the brown stripes of the head will be over the neck.
With black thread, sew eyes on the head between R 10 and R 11 at the distance of 13 sc from each other.
Sew the tail to the back body piece.

Scarf
Make 100 ch.
R 1: From the 3rd ch from hook: 98 hdc, 2 ch, turn
R 2: 98 hdc
Fasten off.

0 Comments