


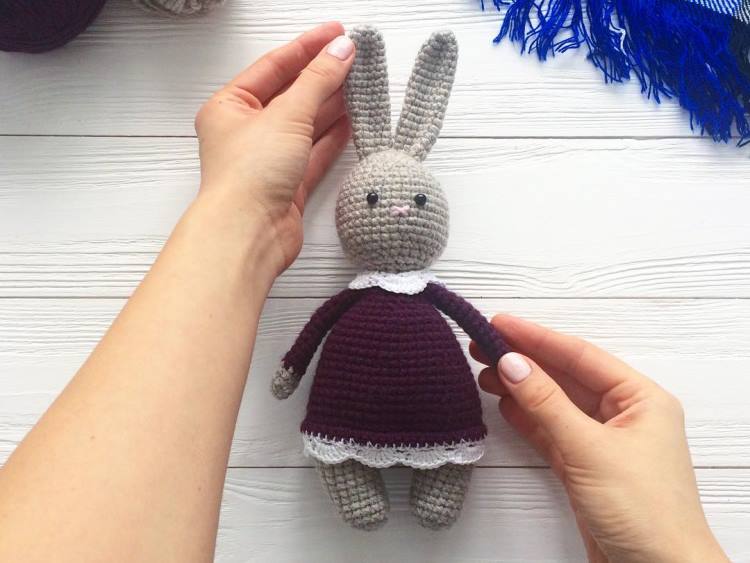


Learn how to crochet a cute Easter bunny with this free amigurumi pattern and step-by-step tutorial! A wide range of materials can be used for decorating the bunny. It can be some crocheted circles, colored buttons, sequins, wooden and glass beads. The height of finished amigurumi bunny is about 13 cm (5″) with ears.
Designer: @sinakova.design
You will need:
- YarnArt Jeans yarn (55% cotton, 45% acrylic, 50 g/160 m): green/ red/ brown (1/2 skein) and white (1/2 skein). For the circles you can use a couple different colors of leftover yarn
- 2.0 mm crochet hook
- 4 mm black beads for eyes
- Sewing needle and thread
- Scissors
- Fiberfill
Free crochet Easter bunny pattern

Abbreviations:
R – row
st – stitch
sl st – slip stitch
sc – single crochet
dc – double crochet
tr – treble crochet
inc – increase (2 sc in one stitch)
dec – decrease (2 sc together)
[…] – number of stitches you should have at the end of the row
(…) – repeat whatever is between the brackets the given number of times

Body, head and ears (one pice)
With green/ red/ brown yarn:
R 1: 6 sc in magic ring [6]
R 2: (inc) repeat 6 times [12]
R 3: (1 sc, inc) repeat 6 times [18]
R 4: 1 sc, inc, (2 sc, inc) repeat 5 times, 1 sc [24]
R 5: (3 sc, inc) repeat 6 times [30]
R 6: BLO 30 sc
R 7: 2 sc, inc, (4 sc, inc) repeat 5 times, 2 sc [36]
R 8: (5 sc, inc) repeat 6 times [42]
R 9: 3 sc, inc, (6 sc, inc) repeat 5 times, 3 sc [48]
R 10-15: 48 sc (6 rows)
R 16: (14 sc, dec) repeat 3 times [45]
R 17: 45 sc
R 18: (13 sc, dec) repeat 3 times [42]
R 19: 42 sc
R 20: (5 sc, dec) repeat 6 times [36]
Stuff with fiberfill.
Change to white yarn:
R 21: 36 sc
R 22: BLO 36 sc
R 23: (4 sc, dec) repeat 6 times [30]
R 24-25: 30 sc (2 rows)
R 26: (3 sc, dec) repeat 6 times [24]
R 27: 24 sc


Continue crochet an ear:
Divide the body in two equal parts (12 sc/ 12 sc).
R 1: start crocheting on the opposite side from the hook, make sc in each st around on the first part, forming a circle. Follow the photo guide below [12]
Stuff the ear a little bit in the first rows only. Do not stuff further.
R 2-10: 12 sc (9 rows)
R 11: 10 sc, dec [11]
R 12: 11 sc
R 13: 9 sc, dec [10]
R 14: 10 sc
R 15: 8 sc, dec [9]
R 16-17: 9 sc (2 rows)
R 18: 7 sc, dec [8]
R 19: 8 sc
R 20: 6 sc, dec [7]
R 21: 5 sc, dec [6]
R 22: 4 sc, dec [5]
Fasten off.


Attach the white yarn between the ears and crochet the second ear in the same way as the first one.
Sew up the hole between the ears with some stitches.
Bottom part
With green/ red/ brown yarn:
R 1: 6 sc in magic ring [6]
R 2: (inc) repeat 6 times [12]
R 3: (1 sc, inc) repeat 6 times [18]
R 4: 1 sc, inc, (2 sc, inc) repeat 5 times, 1 sc [24]
R 5: (3 sc, inc) repeat 6 times [30]
Don’t cut the yarn.


Put out the bottom part with inner part to the bottom of the body.
Crochet on R 6: FLO 30 sc of the body together with sc of the bottom part
Fasten off.


Frill
Attach the white yarn to the front loop of R 22 of the body.
R 1: (1 sc, 1 dc, 1 tr, 1 dc, 1 sc) repeat this pattern to the end of the row
Sl st, fasten off.


Circles for decor
R 1: 8 sc in magic ring [8]
Fasten off and leave a long tail for sewing.
Sew the circles randomly onto the body.

Sew the black beads onto the head as eyes.
Embroider a nose with a black floss.
0 Comments