


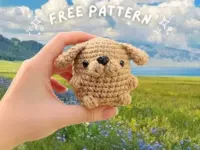


Meet Snoopy, the dog character of the Peanuts cartoon and world-famous comic strip. Right here you can see how to crochet the famous Peanuts dog step by step. Enjoy this free and easy amigurumi pattern, create an adorable handmade Snoopy toy for your beloved child!
Designer: @tamtam_ami
You will need:
- Velvet yarn (white, black or brown and red colors)
- 2.3 mm (3/0) Clover crochet hook
- Black or brown embroidery thread
- Tapestry needle and scissors
- Stitch marker
- Fiberfill
Height: 10.5 cm (4″)
Abbreviations:
R – row
ch – chain
sc – single crochet
st – stitch
sl st – slip stitch
inc – increase (2 sc in one stitch)
dec – decrease (2 sc together)
[…] – number of stitches you should have at the end of the row
(…) – repeat whatever is between the brackets the given number of times
Free crochet Snoopy dog pattern

Head
R 1: 6 sc in magic ring [6]
R 2: (inc) repeat 6 times [12]
R 3: (1 sc, inc) repeat 6 times [18]
R 4: (2 sc, inc) repeat 6 times [24]
R 5: (3 sc, inc) repeat 6 times [30]
R 6: (4 sc, inc) repeat 6 times [36]
R 7-13: 36 sc (7 rows)
R 14: 12 sc, 12 inc, 12 sc [48]
R 15: 12 sc, (1 sc, inc) repeat 12 times, 12 sc [60]
R 16-22: 60 sc (7 rows)
R 23: 12 sc, (1 sc, dec) repeat 12 times, 12 sc [48]
R 24: 48 sc
R 25: (10 sc, dec) repeat 4 times [44]
R 26: (20 sc, dec) repeat 2 times [42]
R 27: (5 sc, dec) repeat 6 times [36]
R 28: 2 sc, dec, (4 sc, dec) repeat 5 times, 2 sc [30]
R 29: (3 sc, dec) repeat 6 times [24]
R 30: 1 sc, dec, (2 sc, dec) repeat 5 times, 1 sc [18]
R 31: (1 sc, dec) repeat 6 times [12]
R 32: (dec) repeat 6 times, sl st [6]
Fasten off.
Ears (make 2)
With black/brown yarn:
R 1: 6 sc in magic ring [6]
R 2: (1 sc, inc) repeat 3 times [9]
R 3: (2 sc, inc) repeat 3 times [12]
R 4: (3 sc, inc) repeat 3 times [15]
R 5: (4 sc, inc) repeat 3 times [18]
R 6-7: 18 sc (2 rows)
R 8: (4 sc, dec) repeat 3 times [15]
R 9-10: 15 sc (2 rows)
R 11: (3 sc, dec) repeat 3 times [12]
R 12-13: 12 sc (2 rows)
R 14: 12 sc, sl st [12]
Fasten off and leave a long tail for sewing.

Nose
With black/brown yarn:
R 1: 5 sc in magic ring [5]
R 2: (inc) repeat 5 times [10]
R 3: 10 sc
R 4: 10 sc, sl st [10]
Fasten off and leave a long tail for sewing.
Body
R 1: 6 sc in magic ring [6]
R 2: (inc) repeat 6 times [12]
R 3: (1 sc, inc) repeat 6 times [18]
R 4: (2 sc, inc) repeat 6 times [24]
R 5: (3 sc, inc) repeat 6 times [30]
R 6: (4 sc, inc) repeat 6 times [36]
R 7: (5 sc, inc) repeat 6 times [42]
R 8-13: 42 sc (6 rows)
R 14: (5 sc, dec) repeat 6 times [36]
R 15: 36 sc
R 16: (4 sc, dec) repeat 6 times [30]
R 17: 30 sc
R 18: (3 sc, dec) repeat 6 times [24]
R 19: 24 sc
R 20: 24 sc, sl st [24]
Fasten off and leave a long tail for sewing.
Arms (make 2)
R 1: 6 sc in magic ring [6]
R 2: (1 sc, inc) repeat 3 times [9]
R 3-11: 9 sc (9 rows)
R 12: 9 sc , sl st [9]
Fasten off and leave a long tail for sewing.
Legs (make 2)
Make 6 ch.
Make an oval, starting from the 2nd ch from hook, work on both sides of the chain.
R 1: from the 2nd ch from hook: 4 sc, 3 sc in one st, along the other side: 3 sc, inc [12]
R 2: 2 inc, 2 sc, 4 inc, 2 sc, 2 inc [20]
R 3: 1 sc, inc, 6 sc, inc, 2 sc, inc, 6 sc, inc, 1 sc [24]
R 4-5: 24 sc (2 rows)
R 6: 1 sc, dec, 5 sc, 4 dec, 5 sc, 1 dec, 1 sc [18]
R 7: 1 dec, 4 sc, 3 dec, 4 sc, 1 dec [13]
R 8-12: 13 sc (5 rows)
R 13: 2 sc, sl st [2]
Fasten off and leave a long tail for sewing.
Tail
R 1: 6 sc in magic ring [6]
R 2: 6 sc
R 3: (1 sc, inc) repeat 3 times [9]
R 4: 9 sc
R 5: (2 sc, inc) repeat 3 times [12]
R 6: 12 sc, sl st [12]
Fasten off and leave a long tail for sewing.

Collar
With red yarn:
Make 27 ch.
R 1: from the 2nd ch from hook: 25 sc, sl st
Fasten off and leave a long tail for sewing.
Sew the collar at the neck.
Assembly and finishing
- Sew the head to the body.
- Sew the nose to the muzzle.
- Embroider the eyes and smile.
- Sew the ears to the head.
- Sew the collar to the body at the neck.
- Sew the arms to the body.
- Sew the legs to the body.
- Attach the tail.
What brand of worsted weight velvet did you use for snoopy? I can only find Bernat Baby which doesn’t have the colors.
PLEASE, COULD BE KNITTED, BECAUSE I DON1T KNOW , IT`S LOVELY. THANKS
Assembly instructions would be helpful, cause just guessing where to attach ears, arms and legs. Did you add extra filling or pipe cleaners through neck to hold up the head?
I’d like assembly instructions as well.
Yes I agree
Please add instructions for the free snoopy pattern
Thank you very much for this very nice pattern!
There’s one crucial thing missing about this pattern. The spot on Snoopys back!
Could you send assembly instructions please? Hard to believe they weren’t included.
Would like to have assembled instructions with it please.
Margaret, I’m reasonably certain these are not their patterns, but instead patterns they’ve copied from other creators. See how the first image is from @tamtam_ami? That’s her Instagram handle, and she’s from Thailand whereas this site is Russian. The wildly different styles of patterns on the site is another clue. Yet another site I’ll have to bookmark so I can let the actual designers know about it – it’s not okay to steal patterns as they take a great deal of time to perfect, then write. 🙁
Tam posted the pattern for free on IG. No assembly instructions, though.
I love it the only problem is that it is as big as my head and it isnt that big on the picture but i like it anyway!
i did it and i loved it!
Hector, could you please send instructions on how to assemble?
Could you post assembly instructions please. Beginners may not know how to do this. Thank you.
Is there somewhere to find assembly instructions?
I am having trouble with the legs not looking right. Do you have a video showing exactly how to do them? It’s just the first row I’m having trouble with first time doing this so I’m lost lol.
Could you please send the assembly instructions? Thank you!
I am hoping this might help someone in the future but for assembly this is what I did:
1) Before stuffing the body I sewed the legs on the bottom of the body (I chose a sitting position so my snoopy could sit on a shelf)
2) sewed the tail on the opposite side of the body from the legs as centered as I could get it (I also left enough space between the legs and tail so my snoopy could sit flat)
3) sewed arms on (I picked a spot that was about halfway between the legs and tail)
4) stuff the body
5) if you made the same mistake as I did and completed the head to finish off this is when you will stuff the head (if you didn’t complete the head to finish off wait till the end to stuff it because it was very hard for me to stuff with a tiny hole)
5) sew on nose on the end and middle of snout area
6) sew ears on each side of the head about halfway between the back of the head and the nose)
7) embroider eyes on the front of the face (I just did little black lines for eyes)
8) attach head to body by sewing
9) sew collar into space between the head and body
Tips:
stuff head as you go to make it easier for yourself
Sew the arms, legs, tail closed with a line of single crochets to make it easier to sew on to the snoopy
Thank you
The last row of the legs doesn’t make sense. Can some clarify this for me?