


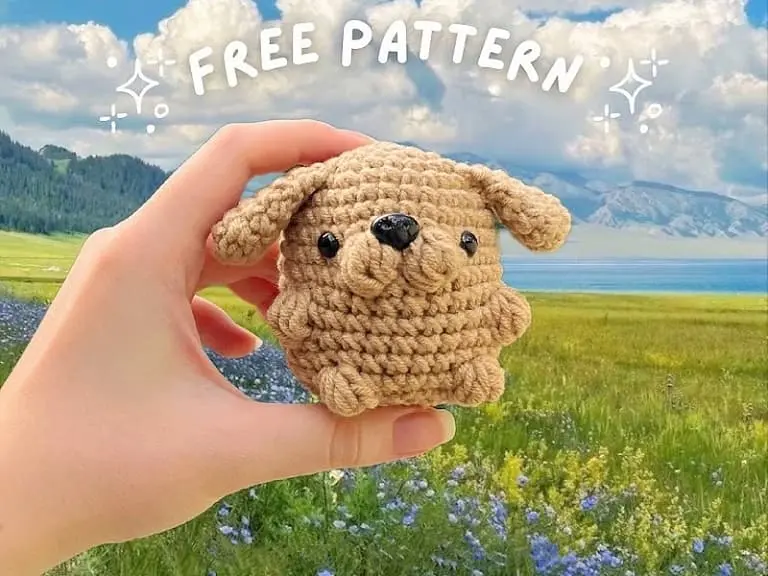
Are you ready to create an adorable little puppy dog that will be a great gift for anyone especially dog lovers! This free and low-sew amigurumi pattern creates the cutest amigurumi puppy that’s perfect for beginners looking to try something small and simple. Your finished puppy dog size will depend on your tension, hook size and yarn weight.
Designer: @the.oldatticproject
You will need:
- Size 4 yarn (khaki)
- 4.5 mm crochet hook
- 7 mm safety eyes
- Dog nose
- Scissors
- Needle for sewing
- Stitch marker
- Stuffing
Free amigurumi puppy dog pattern
Abbreviations:
R – row
ch – chain
sc – single crochet
sts – stitches
DC – double crochet
HDC – half double crochet
BO – bobble stitch
inc – increase (2 single crochet in 1 stitch)
dec – decrease
[…] – number of stitches you should have at the end of the row
(…) – repeat whatever is between the brackets the given number of times
Head and body (one piece)
R 1: 6 sc in magic ring [6]
R 2: (inc) repeat 6 times [12]
R 3: (1 sc, inc) repeat 6 times [18]
R 4: (2 sc, inc) repeat 6 times [24]
R 5: (3 sc, inc) repeat 6 times [30]
R 6-8: 30 sc (3 rows)
R 9: 10 sc, BO, 1 sc, BO, 16 sc [30]
R 10-11: 30 sc (2 rows)
Place the eyes between R 8 and R 9, 7 sts apart or 2 sts away from the snout.
Place the dog nose between the 2 BO sts.
R 12: 8 sc, BO, 9 sc, BO, 11 sc [30]
R 13-14: 30 sc (2 rows)
R 15: 11 sc, BO, 5 sc, BO, 12 sc [30]
R 16: (3 sc, dec) repeat 6 times [24]
R 17: (2 sc, dec) repeat 6 times [18]
R 18: (1 sc, dec) repeat 6 times [12]
R 19: (dec) repeat 6 times [6]
Fasten off.
Ears (make 2)
R 1: 6 sc in magic ring [6]
R 2: (inc) repeat 6 times [12]
R 3-4: 12 sc (2 rows)
R 5: (1 sc, dec) repeat 4 times [8]
R 6: 8 sc
Do not stuff.
R 7: Flatten the opening, sc across the opening to close it [4]
Fasten off and leave a tail for sewing.
Sew the ears between R 4 and R 5 of the head, 2 sts behind the eyes.
Tail
Make 8 ch.
R 1: From the 2nd ch from the hook: 2 sc, 2 HDC, 4 DC [8]
Fasten off and leave a tail for sewing.
Sew the tail to the back of the body.
0 Comments