


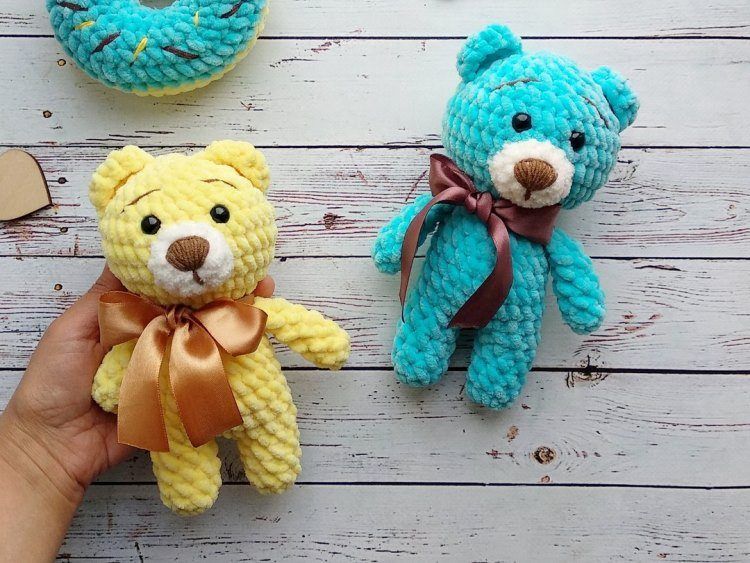


This free and easy amigurumi bear pattern is great to give as a gift (or to just make for yourself). The legs and body of the amigurumi bear are made as one piece. The size of finished crochet bear is 16-18 cm (6.2-7.0″), if you use the same yarn and hook.
Designer: Svetlana Bolotova
You will need:
- YarnArt Jeans yarn (55% cotton, 45% acrylic, 50 g/160 m)
- Some thin cotton yarn for embroidering a nose
- 1.5-1.75 mm crochet hook
- 4-6 mm black beads or safety eyes
- One button
- Tapestry needle
- Scissors
- Stitch marker
- Fiberfill
Free amigurumi bear pattern
Abbreviations:
R – row
ch – chain
st – stitch
sc – single crochet
hdc – half double crochet
inc – increase (2 sc in one stitch)
dec – decrease (2 sc together)
[…] – number of stitches you should have at the end of the row
(…) – repeat whatever is between the brackets the given number of times

Arms (make 2)
Start with main color:
R 1: 6 sc in magic ring [6]
R 2: (inc) repeat 6 times [12]
R 3: (3 sc, inc) repeat 3 times [15]
R 4-7: 15 sc (4 rows)
Change to sweater color:
R 8-16: 15 sc (9 rows)
R 17: (3 sc, dec) repeat 3 times [12]
Fold the top opening flat and 5 sc through both sides.
Fasten off and leave a long tail for sewing.

Legs and body
Legs (make 2)
With main yarn:
R 1: 6 sc in magic ring [6]
R 2: (inc) repeat 6 times [12]
R 3: (1 sc, inc) repeat 6 times [18]
R 4-9: 18 sc (6 rows)
Fasten off.
Crochet the second leg, do not fasten off.
Make 5 ch on the second leg and join with the first leg in the last st of the R 9.
Continue crocheting the body in the round:
R 10: inc in last st of R 9 on the first leg, 17 sc on the first leg, 5 sc in 5 ch, inc in last st of R 9 on the second leg, 17 sc on the second leg, 5 sc in 5 ch (opposite side) [48]
R 11: 48 sc
Change to sweater color:
R 12-26: 48 sc (15 rows)
R 27: (6 sc, dec) repeat 6 times [42]
R 28-29: 42 sc (2 rows)
R 30: (5 sc, dec) repeat 6 times [36]
R 31: 36 sc
R 32: (4 sc, dec) repeat 6 times [30]
R 33: (3 sc, dec) repeat 6 times [24]
Change to main yarn:
R 34: 24 sc
Fasten off and leave a long tail for sewing.

Head
With main yarn:
R 1: 6 sc in magic ring [6]
R 2: (inc) repeat 6 times [12]
R 3: (1 sc, inc) repeat 6 times [18]
R 4: (2 sc, inc) repeat 6 times [24]
R 5: (3 sc, inc) repeat 6 times [30]
R 6: (4 sc, inc) repeat 6 times [36]
R 7: (5 sc, inc) repeat 6 times [42]
R 8: (6 sc, inc) repeat 6 times [48]
R 9-20: 48 sc (12 rows)
Insert eyes (if you use safety eyes) between R 14 and R 15 at the distance of 7 st from each other.
R 21: (6 sc, dec) repeat 6 times [42]
R 22: (5 sc, dec) repeat 6 times [36]
R 23: (4 sc, dec) repeat 6 times [30]
R 24: (3 sc, dec) repeat 6 times [24]
Fasten off.

Ears (make 2)
With main yarn:
R 1: 6 sc in magic ring [6]
R 2: (inc) repeat 6 times [12]
R 3: (1 sc, inc) repeat 6 times [18]
R 4: 18 sc
R 5: (4 sc, dec) repeat 3 times [15]
Don’t stuff.
Fasten off and leave a long tail for sewing.

Muzzle
With main yarn:
R 1: 6 sc in magic ring [6]
R 2: (inc) repeat 6 times [12]
R 3: (1 sc, inc) repeat 6 times [18]
R 4: (2 sc, inc) repeat 6 times [24]
R 5-6: 24 sc (2 rows)
Fasten off and leave a long tail for sewing.

Tail
With main yarn:
R 1: 6 sc in magic ring [6]
R 2: (inc) repeat 6 times [12]
R 3-4: 12 sc (2 rows)
R 5: (dec) repeat 6 times [6]
Fasten off and leave a long tail for sewing.

Scarf
Make 100 ch.
R 1: From the 3rd ch from hook: 98 hdc, 2 ch, turn
R 2: 98 hdc
Fasten off.
Assembly
Sew the ears to the head, the head to the body.
Sew the eyes (if you use black beads) between R 14 and R 15, about 7 stitches apart.
Sew the arms to the body between R 30 and R 31.
Sew the tail to the back of the body, lightly stuff as you go.
Sew the muzzle to the head between R 14 and R 22, stuff as you go.
Sew one button to the sweater.
Embroider the eyebrows and nose using brown yarn.
0 Comments