


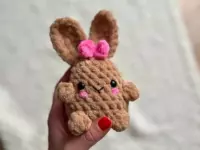


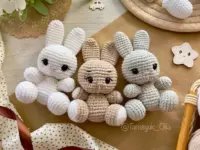


You can crochet an adorable striped bunny, which will be a great gift for any occasion and a true friend for a child or adult. The head and body of the amigurumi bunny are crocheted as a single piece, the legs and arms are attached to the body with single crochet.
Designer: @darya_neustroeva
You will need:
- YarnArt Jeans yarn (55% cotton, 45% acrylic, 50 g/160 m)
- 2.0 mm crochet hook
- 8-10 mm safety eyes
- Black thin yarn or embroidery floss for nose and eyebrows
- Some white yarn for eye whites
- Sewing needle
- Scissors
- Fiberfill
Height: 22-26 cm (8.6-10″)
Free amigurumi striped bunny pattern
Abbreviations:
R – row
sc – single crochet
inc – increase (2 sc in one stitch)
dec – decrease (2 sc together)
[…] – number of stitches you should have at the end of the row
(…) – repeat whatever is between the brackets the given number of times
Arms (make 2)
R 1: 6 sc in magic ring [6]
R 2: (inc) repeat 6 times [12]
R 3: (1 sc, inc) repeat 6 times [18]
R 4-6: 18 sc (3 rows)
R 7: (1 sc, dec) * 6 [12]
Then alternate colors to get stripes (change color every 4 rows):
R 8-26: 12 sc (19 rows)
Don’t stuff the upper part of the arm with fiberfill.
Fold the top opening flat and 6 sc through both sides.
Fasten off.
Legs (make 2)
R 1: 6 sc in magic ring [6]
R 2: (inc) repeat 6 times [12]
R 3: (1 sc, inc) repeat 6 times [18]
R 4: (2 sc, inc) repeat 6 times [24]
R 5-8: 24 sc (4 rows)
R 9: (2 sc, dec) repeat 6 times [18]
R 10: (4 sc, dec) repeat 3 times [15]
Then alternate colors to get stripes (change color every 4 rows):
R 11-29: 15 sc (19 rows)
Don’t stuff the upper part of the leg with fiberfill.
Fold the top opening flat and 8 sc through both sides.
Fasten off.

Ears (make 2)
Change color every 4 rows:
R 1: 6 sc in magic ring [6]
R 2: (inc) repeat 6 times [12]
R 3: 12 sc
R 4: (1 sc, inc) repeat 6 times [18]
R 5-6: 18 sc (2 rows)
R 7: (2 sc, inc) repeat 6 times [24]
R 8-17: 24 sc (10 rows)
R 18: (2 sc, dec) repeat 6 times [18]
R 19: (1 sc, dec) repeat 6 times [12]
Fourfold the top opening flat and and 3 sc through both sides.
Fasten off and leave a long tail for sewing.
Body and head (one piece)
Change color every 4 rows:
R 1: 6 sc in magic ring [6]
R 2: (inc) repeat 6 times [12]
R 3: (1 sc, inc) repeat 6 times [18]
R 4: (2 sc, inc) repeat 6 times [24]
R 5: (3 sc, inc) repeat 6 times [30]
R 6: (4 sc, inc) repeat 6 times [36]
R 7: (5 sc, inc) repeat 6 times [42]
R 8: (6 sc, inc) repeat 6 times [48]
R 9-11: 48 sc (3 rows)
R 12: attach the legs: 8 sc, 8 sc together with sc of the 1st leg, 16 sc, 8 sc together with sc of the 2nd leg, 8 sc
R 13-14: 48 sc (2 rows)
R 15: (6 sc, dec) repeat 6 times [42]
R 16-18: 42 sc (3 rows)
R 19: (5 sc, dec) repeat 6 times [36]
R 20-21: 36 sc (2 rows)
R 22: (4 sc, dec) repeat 6 times [30]
R 23-24: 30 sc (2 rows)
R 25: (3 sc, dec) repeat 6 times [24]
R 26-27: 24 sc (2 rows)
R 28: 24 sc, attaching arms right above the legs [24]
R 29: (2 sc, dec) repeat 6 times [18]
Stuff with fiberfill.
Stuff firmly the neck area. A firmly stuffed neck will hold the head up.
Continue crocheting the head:
R 30: (inc) repeat 18 times [36]
R 31: (5 sc, inc) repeat 6 times [42]
R 32: (6 sc, inc) repeat 6 times [48]
R 33: (7 sc, inc) repeat 6 times [54]
R 34-42: 54 sc (9 rows)
Insert safety eyes between R 38 and R 39.
R 43: (7 sc, dec) repeat 6 times [48]
R 44: (6 sc, dec) repeat 6 times [42]
R 45: 42 sc
R 46: (5 sc, dec) repeat 6 times [36]
R 47: (4 sc, dec) repeat 6 times [30]
R 48: (3 sc, dec) repeat 6 times [24]
R 49: (2 sc, dec) repeat 6 times [18]
Stuff with fiberfill.
R 50: (1 sc, dec) repeat 6 times [12]
R 51: (dec) repeat 6 times [6]
Fasten off.
Tail
R 1: 6 sc in magic ring [6]
R 2: (inc) repeat 6 times [12]
R 3: 12 sc
Fasten off and leave a long tail for sewing.
Assembly
Sew the ears on the top of the head.
Sew the tail to the body, adding some fiberfill inside the tail before you finish.
Embroider nose, eyebrows and lashes with black yarn.
Embroider whites of eyes using white yarn.
What colors did you use from Yarn Art Jean?