


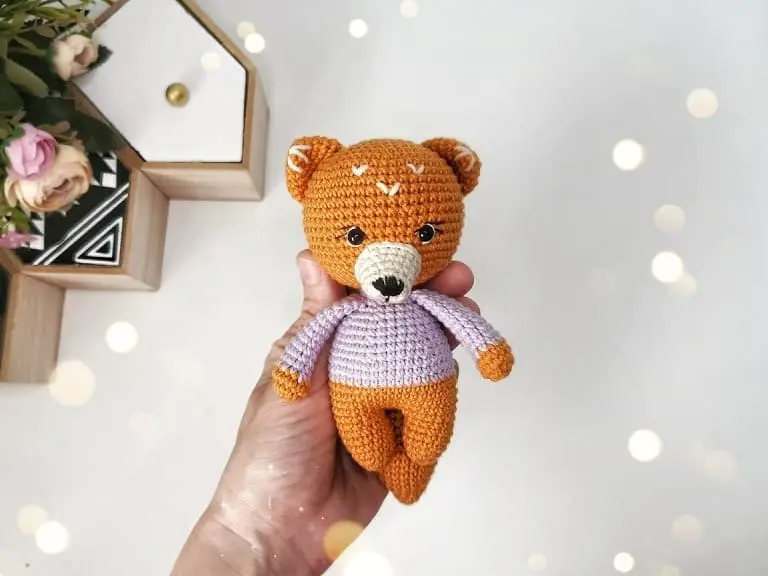
Create your own adorable little fox with this free amigurumi pattern. The body and legs of the amigurumi fox are made as a single piece, other parts are crocheted separately. The tail and arms are attached with single crochet as you crochet the body. The finished crochet fox is approximately 13 cm (5.1″).
Designer: @keti.amigurumi
You will need:
- Etrofil Amigurumi yarn (60% cotton, 40% acrylic, 50 g/145 m) for a fox
- YarnArt Jeans yarn (55% cotton, 45% acrylic, 50 g/160 m) for a sweater
- 2.0 mm crochet hook
- 8 mm safety eyes
- Black embroidery thread
- Sewing needle
- Sewing pins
- Fiberfill
Free amigurumi fox pattern
Abbreviations:
R – row
ch – chain
sc – single crochet
inc – increase (2 sc in one stitch)
dec – decrease (2 sc together)
[…] – number of stitches you should have at the end of the row
(…) – repeat whatever is between the brackets the given number of times
Head
R 1: 7 sc in magic ring [7]
R 2: (inc) repeat 7 times [14]
R 3: (1 sc, inc) repeat 7 times [21]
R 4: (2 sc, inc) repeat 7 times [28]
R 5: (3 sc, inc) repeat 7 times [35]
R 6: (4 sc, inc) repeat 7 times [42]
R 7: (5 sc, inc) repeat 7 times [49]
R 8-18: 49 sc (11 rows)
Insert safety eyes between R 14 and R 15, 7 stitches apart.
R 19: (5 sc, dec) repeat 7 times [42]
R 20: (4 sc, dec) repeat 7 times [35]
R 21: (3 sc, dec) repeat 7 times [28]
R 22: (2 sc, dec) repeat 7 times [21]
R 23: (5 sc, dec) repeat 3 times [18]
Fasten off.

Arms (make 2)
R 1: 6 sc in magic ring [6]
R 2: (inc) repeat 6 times [12]
R 3: 12 sc
Change to sweater color:
R 4: 12 sc
R 5: 2 dec, 8 sc [10]
R 6-14: 10 sc (9 rows)
Stuff the arm 1/2 full.
Fold the top opening flat and 4 sc through both sides.
Fasten off.
Tail
Start with white yarn:
R 1: 6 sc in magic ring [6]
R 2: (1 sc, inc) repeat 3 times [9]
R 3: (2 sc, inc) repeat 3 times [12]
R 4: (3 sc, inc) repeat 3 times [15]
R 5: (4 sc, inc) repeat 3 times [18]
Change to orange yarn:
R 6-9: 18 sc (4 rows)
R 10: (4 sc, dec) repeat 3 times [15]
R 11: 15 sc
R 12: (3 sc, dec) repeat 3 times [12]
R 13-15: 12 sc (3 rows)
Stuff the tail.
Fold the top opening flat and 5 sc through both sides.
Fasten off.
Legs and body (one piece)
Legs (make 2)
With orange yarn:
R 1: 6 sc in magic ring [6]
R 2: (inc) repeat 6 times [12]
R 3: (1 sc, inc) repeat 3 times, 6 sc [15]
R 4-7: 15 sc (4 rows)
Stuff the leg.
Fasten off on the first leg only.
Crochet the second leg, do not fasten off.
Make 4 ch and join with the first leg. In total there will be 38 stitches.
Continue crocheting the body in the round.
R 1: 4 sc, inc, 2 sc, inc, 16 sc, inc, 2 sc, inc, 10 sc [42]
R 2-3: 42 sc (2 rows)
Change to sweater color:
R 4: 42 sc
R 5: Attach the tail on the body (crochet sc of the body together with sc of the tail) – 42 sc
R 6-7: 42 sc (2 rows)
R 8: (5 sc, dec) repeat 6 times [36]
R 9: 36 sc
Stuff the body.
R 10: (4 sc, dec) repeat 6 times [30]
R 11-12: 30 sc (2 rows)
R 13: (3 sc, dec) repeat 6 times [24]
R 14: 24 sc
R 15: (2 sc, dec) repeat 6 times [18]
R 16: Attach the arms on the sides of the body (crochet sc of the body together with sc of the arm) – 18 sc
R 17: 18 sc
Fasten off and leave a long tail for sewing.
Ears (make 2)
With orange yarn:
R 1: 6 sc in magic ring [6]
R 2: (1 sc, inc) repeat 3 times [9]
R 3: (2 sc, inc) repeat 3 times [12]
R 4: (3 sc, inc) repeat 3 times [15]
R 5: (4 sc, inc) repeat 3 times [18]
Fold the top opening flat and 8 sc through both sides.
Fasten off and leave a long tail for sewing.
Muzzle
With white yarn:
R 1: 8 sc in magic ring [8]
R 2: (1 sc, inc) repeat 4 times [12]
R 3: (2 sc, inc) repeat 4 times [16]
R 4: (3 sc, inc) repeat 4 times [20]
R 5: 20 sc
Fasten off and leave a long tail for sewing.

Assembly
Sew the head to the body, the ears on the head.
Sew the muzzle to the head, stuffing it with fiberfill.
Embroider a nose, eyebrows and lashes using a black thread.
Embroider some ticks on the head and eye whites using a white yarn.
0 Comments