


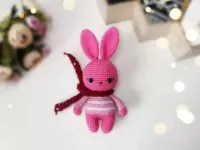


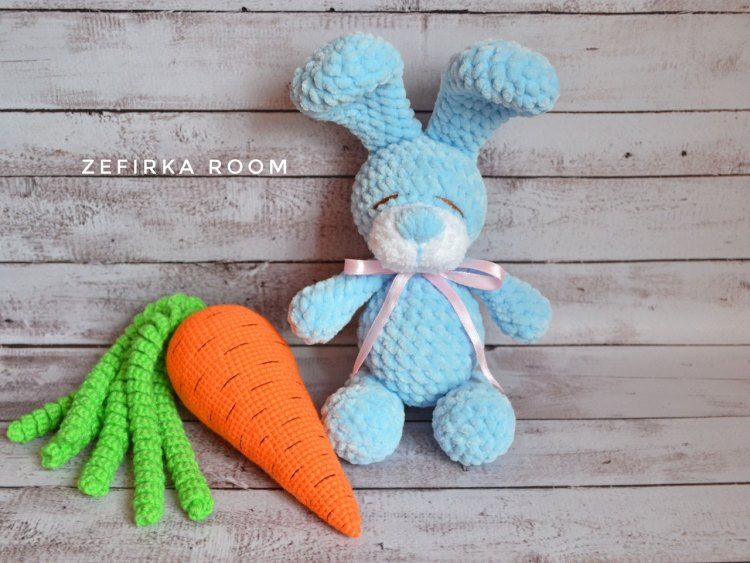
Bunny: designed by Mariya Kostyuchenko (@mariya.kostychenko) and Olga Filippova (@zefirka.room), photos by Olga Filippova
Carrot: designed and photos by Yana Dymskaya (@yana_dym_sky)
You will need:
- For a bunny: yarn Himalaya Dolphin Baby (1/2 skein), 4.00 mm crochet hook
- For a carrot: yarn Alize Bella, 2.00 mm crochet hook
Height (a bunny without ears) – 17 cm, ears – 8 cm.
Height (a carrot) – 13.5 cm.
Amigurumi bunny free crochet plush pattern

Abbreviations:
R – row
ch – chain
st – stitch
sc – single crochet
inc – increase (2 sc in one stitch)
dec – decrease (2 sc together)
BLO – back loop only
[…] – number of stitches you should have at the end of the row
(…) – repeat whatever is between the brackets the given number of times
Head
R 1: 6 sc in magic ring [6]
R 2: (inc) repeat 6 times [12]
R 3:(1 sc, inc) repeat 6 times [18]
R 4: (2 sc, inc) repeat 6 times [24]
R 5: (3 sc, inc) repeat 6 times [30]
R 6-9: 30 sc
R 10: (3 sc, dec) repeat 6 times [24]
R 11: (2 sc, dec) repeat 6 times [18]
R 12: (1 sc , dec) repeat 6 times [12]
R 13: (inc) repeat 6 times [6]
Fasten off and leave a tail for sewing.
Ears (make 2)
R 1: 6 sc in magic ring [6]
R 2: (inc) repeat 6 times [12]
R 3: (1 sc, inc) repeat 6 times [18]
R 4-7: 18 sc (4 rows)
R 8: (1 sc, dec) repeat 6 times [12]
R 9-10: 12 sc (2 ряда)
R 11: (dec, 4 sc) repeat 2 times [10]
R 12: 10 sc
R 13: (dec, 3 sc) repeat 2 times [8]
R 14: 8 sc
Don’t stuff.
Fold the top opening in half and sc through both sides.
Fasten off and leave a tail for sewing.
Muzzle
R 1: 6 sc in magic ring [6]
R 2: (inc) repeat 6 times [12]
R 3: (1 sc, inc) repeat 6 times [18]
R 4: (2 sc, inc) repeat 6 times [24]
R 5: 24 sc
Fasten off and leave a tail for sewing.
Body
R 1: 6 sc in magic ring [6]
R 2: (inc) repeat 6 times [12]
R 3: (1 sc, inc) repeat 6 times [18]
R 4: (2 sc, inc) repeat 6 times [24]
R 5-9) 24 sc (5 rows)
R 10) (2 sc, dec) repeat 6 times [18]
R 11) 18 sc
R 12) (1 sc, dec) repeat 6 times [12]
R 13-14) 12 сбн (2 rows)
Fasten off and leave a tail for sewing.
Legs (make 2)
R 1: 5 sc in magic ring [5]
R 2: (inc) repeat 5 times [10]
R 3: (1 sc, inc) repeat 5 times [15]
R 4: BLO 15 sc
R 5: 15 sc
R 6: 3 sc; (dec, 1 sc) repeat 3 times; 3 sc [12]
R 7: 4 sc, 2 dec, 4 sc [10]
R 8-11: 10 sc (4 rows)
R 12: dec repeat 5 times [5]
Fasten off and leave a tail for sewing.
Arms (make 2)
R 1: 6 sc in magic ring [6]
R 2: (1 sc, inc) repeat 3 times [9]
R 3-5: 9 sc (3 rows)
R 6: 1 dec, 7 sc [8]
R 7: 8 sc
R 8: 1 dec, 6 sc [7]
R 9: 1 dec, 5 sc [6]
R 10: (1 sc, dec) repeat 3 times [3]
Fasten off and leave a tail for sewing.
Crochet carrot free amigurumi pattern


Crochet carrot video tutorial: youtu.be/E-1Ixz-MzJs
With orange yarn:
R 1: 6 sc in magic ring [6]
R 2: (1 sc, inc) repeat 3 times [9]
R 3: 9 sc
R 4: (2 sc, inc) repeat 3 times [12]
R 5: 12 sc
R 6: (3 sc, inc) repeat 3 times [15]
R 7: 15 sc
R 8: (4 sc, inc) repeat 3 times [18]
R 9: 18 sc
R 10: (5 sc, inc) repeat 3 times [21]
R 11: 21 sc
R 12: (6 sc, inc) repeat 3 times [24]
R 13: 24 sc
R 14: (7 sc, inc) repeat 3 times [27]
R 15: 27 sc
R 16: (8 sc, inc) repeat 3 times [30]
R 17: 30 sc
R 18: (9 sc, inc) repeat 3 times [33]
R 19: 33 sc
R 20: (10 sc, inc) repeat 3 times [36]
R 21: 36 sc
R 22: (11 sc, inc) repeat 3 times [39]
R 23: 39 sc
R 24: (12 sc, inc) repeat 3 times [42]
R 25-30: 42 sc (6 rows)
R 31: (5 sc, dec) repeat 6 times [36]
R 32: (4 sc, dec) repeat 6 times [30]
R 33: (3 sc, dec) repeat 6 times [24]
R 34: (2 sc, dec) repeat 6 times [18]
R 35: (1 sc, dec) repeat 6 times [12]
R 36: (dec) repeat 6 times [6]
Fasten off.
With green yarn: (make 5-7)
Make 50-60 ch (about 20 cm long).
R 1: From the 2nd ch from hook 3 sc in every st to the end of row.
The brownish markings on the carrot are embroidered.
Use YarnArt Canarias yarn (colour 9999, 203m/20g).
If you don’t know how to do this, view the video tutorial at 33:37. You can find the link to this tutorial below photos of carrot.
The carrot pattern doesn’t mention the brownish markings on the veg – is it part of the yarn or added later?
The brownish markings are embroidered. If you don’t know how to do this, view the video tutorial at 33:37. You can find the link to this tutorial below photos of carrot.